Data Transfer
Last update: May 5, 2025
TACC supports two primary technologies for data transfer: SSH (also referred to as SCP and SFTP) and Globus (also referred to as GridFTP). All TACC systems support SSH-based transfer, and most TACC systems support Globus-based transfer. When in doubt, we recommend that you start with SSH-based transfer as this requires the least setup and utilizes the TACC authentication system. Globus uses its own authentication system and will require additional setup steps, outlined below.
There are many SSH-compatible clients across all platforms, and almost any modern SSH client will successfully interoperate with TACC systems. While we provide examples using the Cyberduck application, users are encouraged to select and utilize whichever transfer client is most familiar to them and most functional on your platform. Many SSH clients are organized to assist with specific workflows.
For SSH-based transfers, you will need two pieces of information in addition to your TACC username/password combination: the HOSTNAME of the system you are transferring to, and the PATH that you are attempting to access. Especially if you are uploading data, it is very important that you select the correct path for the resource and project - otherwise your data will be at risk of being lost or misplaced. The path may include a functional name such as /scratch/ or a resource name such as /corral/ .
Globus-based transfers usually utilize an endpoint name (usually the name of the HPC or Storage resource you are connecting to) rather than a hostname, but you will still need to know the endpoint name, and you will always need the PATH that you are addressing, in order to successfully transfer data.
All TACC resources support SSH-based transfer, and most TACC resources support Globus-based transfer.
SSH
You can access SSH utilities via a client application, a GUI interface, or on the command-line via a Terminal application.
- Graphical User Interface (GUI) tools, e.g. Cyberduck.
- Command-line (CLI) tools e.g.
scp,sftp,rsync
Cyberduck
TACC staff recommends the open-source Cyberduck utility for both Windows and Mac users that do not already have a preferred tool.
Cyberduck is a free graphical user interface for data transfer and is an alternative to using the command line. With a drag-and-drop interface, it is easy to transfer a file from your local system to the remote secure system. You can use Cyberduck for Windows or macOS.
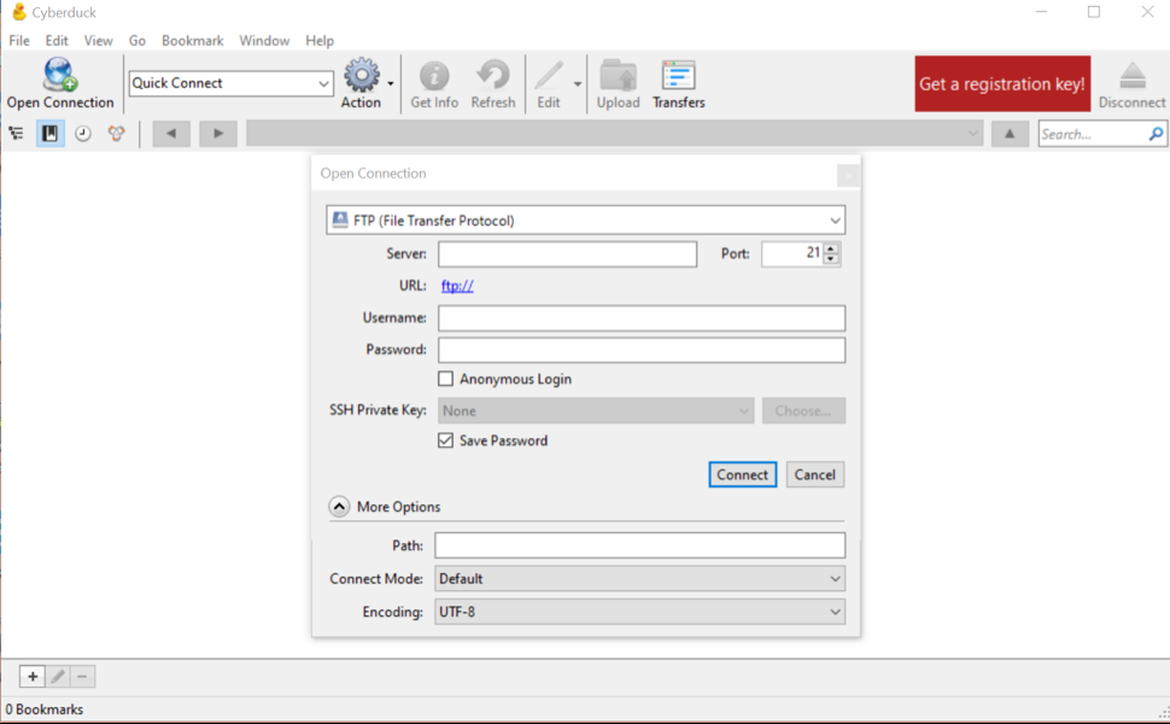
Click on the "Open Connection" button in the top right corner of the Cyberduck window to open a connection configuration window (as shown below) transfer mechanism, and type in the server name "stampede3.tacc.utexas.edu". Add your username and password in the spaces provided, and if the "more options" area is not shown click the small triangle or button to expand the window; this will allow you to enter the path to your project area so that when Cyberduck opens the connection you will immediately see your data. Then click the "Connect" button to open your connection.
Once installed, click "Open Connection" in the top left corner of your Cyberduck window.
Once connected, you can navigate through your remote file hierarchy using familiar graphical navigation techniques. You may also drag-and-drop files into and out of the Cyberduck window to transfer files to and from Frontera.

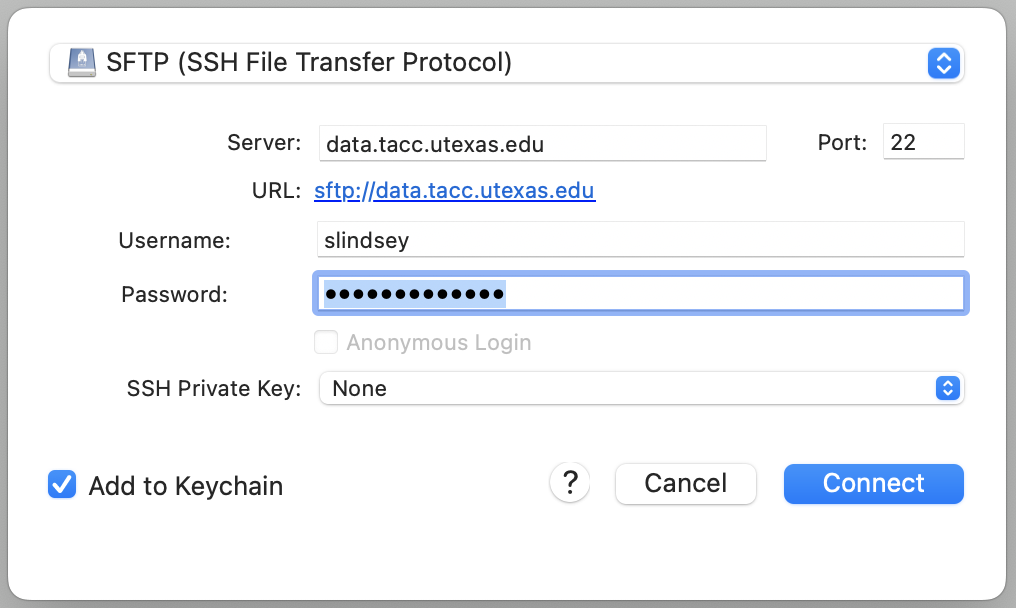
To set up a connection, type in the server name, host. Add your TACC username and password in the spaces provided. If the "More Options" area is not shown, click the small triangle button to expand the window; this will allow you to enter the path to your transfer directory, /transfer/directory/path, so that when Cyberduck opens the connection you will immediately be in your individualized transfer directory on the system. Click the "Connect" button to open your connection.
Consult Figure 2. below to ensure the information you have provided is correct. If you have not done so already, replace the "Path" with the path to your individualized transfer directory.

Note
You will be prompted to "allow unknown fingerprint" upon connection. Select "allow" and then enter your TACC token value.
Once connected, you can navigate through your remote file hierarchy using the graphical user interface. You may also drag-and-drop files from your local computer into the Cyberduck window to transfer files to the system.
Transfer Scenarios
Let's examine the most common data transfer scenarios for TACC users. In all the following text, the term "data" can refer to anything from a single file to multiple directories.
- Between your laptop and TACC resources
- Between TACC HPC resources
- Between institutions
- Between TACC HPC and storage resources
1. Transfer data between your laptop and a TACC resource
Moving data from your home computer/laptop to a TACC resource is called "pushing" or "uploading" that file. Conversely, when copying data from a TACC resource to your laptop, this is "pulling" or "downloading" data. In the following examples, all transfers are initiated from your laptop, not the TACC resource, since your laptop likely does not have a fixed IP address.
Example 1: TACC account holder bjones uploads a local file, mylaptopfile, to his home directory on Stampede3.
localhost$ scp mylaptopfile bjones@stampede3.tacc.utexas.edu::" at the end of the line.
Example 2: TACC account holder bjones downloads a file located in his home directory on Stampede3, myTACCfile, to his laptop.
localhost$ scp bjones@stampede3.utexas.edu:myTACCfile .2. Transfer files between TACC HPC resources
Transfer files between TACC HPC resources, e.g. Stampede3 to Vista.
If you have an allocation on more than one TACC HPC resource, and want to move a file from one home directory or another, make use of the shared $WORK file system. There's no need for scp when both the source and destination involve subdirectories of $STOCKYARD.
Example: copy myfile in my home directory on Stampede3 to my account on Vista.
stampede3$ cp myfile $WORK
stampede3$ ssh vista
vista$ mv $WORK/myfile .
vista$ exit
stampede3$
3. Transfer Files Between Institutions
If you are a researcher with data located at multiple institutions, we recommend you use Globus for large data set transfers to TACC. You will need to authenticate with your institution. See how to set up your TACC account to use Globus.
4. Backup/Transfer files between TACC HPC and TACC storage resources
To backup files to TACC's Ranch archive, consult the Ranch User Guide. Consult the Corral User Guide for instructions on transferring between Lonestar6 and Corral.
SSH Command-Line Examples
Transfer files between TACC HPC resources and other Linux-based systems using either scp or rsync. Both scp and rsync are available in the Mac Terminal app. Windows SSH clients typically include scp-based file transfer capabilities.
The scp and rsync commands are standard UNIX data transfer mechanisms used to transfer moderate size files and data collections between systems. These applications use a single thread to transfer each file one at a time. The scp and rsync utilities are typically the best methods when transferring Gigabytes of data. For larger data transfers, parallel data transfer mechanisms, e.g., Globus, can often improve total throughput and reliability.
Note
It is possible to use these command line tools if your local machine runs Windows, but you will need to use an SSH client (ex. CyberDuck).
To simplify the data transfer process, we recommend that Windows users follow the How to Transfer Data with Cyberduck guide as detailed below.
Advanced scp Examples
The Linux scp (secure copy) utility is a component of the OpenSSH suite. Assuming your Lonestar6 username is bjones, a simple scp transfer that copies a file named myfile from your local Linux system to Lonestar6 $HOME would look like this:
localhost$ scp ./myfile bjones@ls6.tacc.utexas.edu: # note colon at end of lineYou can use wildcards, but you need to be careful about when and where you want wildcard expansion to occur. For example, to push all files ending in .txt from the current directory on your local machine to /work/01234/bjones/scripts on Lonestar6:
localhost$ scp *.txt bjones@ls6.tacc.utexas.edu:/work/01234/bjones/ls6To delay wildcard expansion until reaching Lonestar6, use a backslash (\) as an escape character before the wildcard. For example, to pull all files ending in .txt from /work/01234/bjones/scripts on Lonestar6 to the current directory on your local system:
localhost$ scp bjones@ls6.tacc.utexas.edu:/work/01234/bjones/ls6/\*.txt .Note
Using scp with wildcard expansion on the remote host is unreliable. Specify absolute paths wherever possible.
You can of course use shell or environment variables in your calls to scp. For example:
localhost$ destdir="/work/01234/bjones/ls6/data"
localhost$ scp ./myfile bjones@ls6.tacc.utexas.edu:$destdir
You can also issue scp commands on your local client that use Lonestar6 environment variables like $HOME, $WORK, and $SCRATCH. To do so, use a backslash (\) as an escape character before the $; this ensures that expansion occurs after establishing the connection to Lonestar6:
localhost$ scp ./myfile bjones@ls6.tacc.utexas.edu:\$SCRATCH/data # Note backslashAvoid using scp for recursive transfers of directories that contain nested directories of many small files:
localhost$ scp -r ./mydata bjones@ls6.tacc.utexas.edu:\$SCRATCH # DON'T DO THISInstead, use tar to create an archive of the directory, then transfer the directory as a single file:
localhost$ tar cvf ./mydata.tar mydata                             # create archive
localhost$ scp     ./mydata.tar bjones@ls6.tacc.utexas.edu:\$WORK  # transfer archive
Consult the scp man pages for more information:
login1$ man scpTransferring Files with rsync
The rsync (remote synchronization) utility is another way to keep your data up to date. In contrast to scp, rsync transfers only the actual changed parts of a file (instead of transferring an entire file). Hence, this selective method of data transfer can be much more efficient than scp. The following example demonstrates usage of the rsync command for transferring a file named myfile.c from its current location on Stampede to Frontera's $DATA directory.
localhost$ rsync       mybigfile bjones@frontera.tacc.utexas.edu:\$WORK/data
localhost$ rsync -avtr mybigdir  bjones@frontera.tacc.utexas.edu:\$WORK/data
The options on the second transfer are typical and appropriate when synching a directory:
- this is a recursive update (
-r) - with verbose (
-v) feedback; - the synchronization preserves time stamps (
-t) as well as symbolic links - and other meta-data (
-a).
Because rsync only transfers changes, recursive updates with rsync may be less demanding than an equivalent recursive transfer with scp.
Tip
Lonestar6 & Frontera users
See Good Conduct for additional important advice about striping the receiving directory when transferring large files; watching your quota on $HOME and $WORK; and limiting the number of simultaneous transfers.
Tip
Remember that $STOCKYARD (and your $WORK directory on each TACC resource) is available from several other TACC systems: there's no need for scp when both the source and destination involve subdirectories of $STOCKYARD.
login1$ rsync myfile.c TACC-username@frontera.tacc.utexas.edu:/data/01698/TACC-username/dataAn entire directory can be transferred from source to destination by using rsync as well. For directory transfers the options -avtr will transfer the files recursively (-r option) along with the modification times (-t option) and in the archive mode (-a option) to preserve symbolic links, devices, attributes, permissions, ownerships, etc. The -v option (verbose) increases the amount of information displayed during any transfer. The following example demonstrates the usage of the -avtr options for transferring a directory named gauss from the present working directory on Stampede to a directory named data in the $WORK file system on Frontera.
login1$ rsync -avtr ./gauss \
TACC-username@frontera.tacc.utexas.edu:/data/01698/TACC-username/data
For more rsync options and command details, run the command rsync -h or:
login1$ man rsyncWarning
When executing multiple instantiations of any of the commands listed above, scp, sftp and rsync, limit your active transfers to no more than 2-3 processes at a time.
UTBox and other Third-Party Storage Services
Unfortunately TACC does not allow direct access from UT Box or other third-party storage services such as Dropbox, Google or Amazon storage services. To transfer files from one of these services:
- Manually download the files from one of these services to your laptop
- Using one of the tools outlined in this document (e.g.
scpor Cyberduck), upload the files from your laptop to the desired TACC resource (e.g. Stampede3, Frontera).
Globus Data Transfer Guide
Globus supplies high speed, reliable, asynchronous transfers to the portal. Globus is fast, for large volumes of data, as it uses multiple network sockets simultaneously to transfer data. It is reliable for large numbers of directories and files, as it can automatically fail and restart itself, and will only notify you when the transfers are completed successfully.
This document leads you through the steps required to set up Globus to use for the first time. Several steps will need to be repeated each time you set up a new computer to use Globus for the portal. Once you are set up, you can use Globus not only for transfers to and from the portal, but also to access other cyberinfrastructure resources at TACC and around the world.
To start using Globus, you need to do two things: Generate a unique identifier, an ePPN*, for all Globus services, and enroll the machine you are transferring data to/from with Globus. This can be your personal laptop or desktop, or a server to which you have access. Follow this one-time process to set up the Globus file transfer capability.
Note
Globus Transition. Globus has transitioned to version 5.4. This transition impacts all TACC researchers who use Globus and requires you to update your profile with an ePPN to continue using the Globus service. The use of "Distinguished Names", or DNs, is no longer supported.
Important
You must use your institution's credentials and not your personal email account (e.g. Google, Yahoo!, AOL) when setting up Globus. You will encounter problems with the transfer endpoints (e.g. Frontera, Stampede3, Corral, Ranch) if you use your personal account information.
Step 1. Retrieve your Unique ePPN.
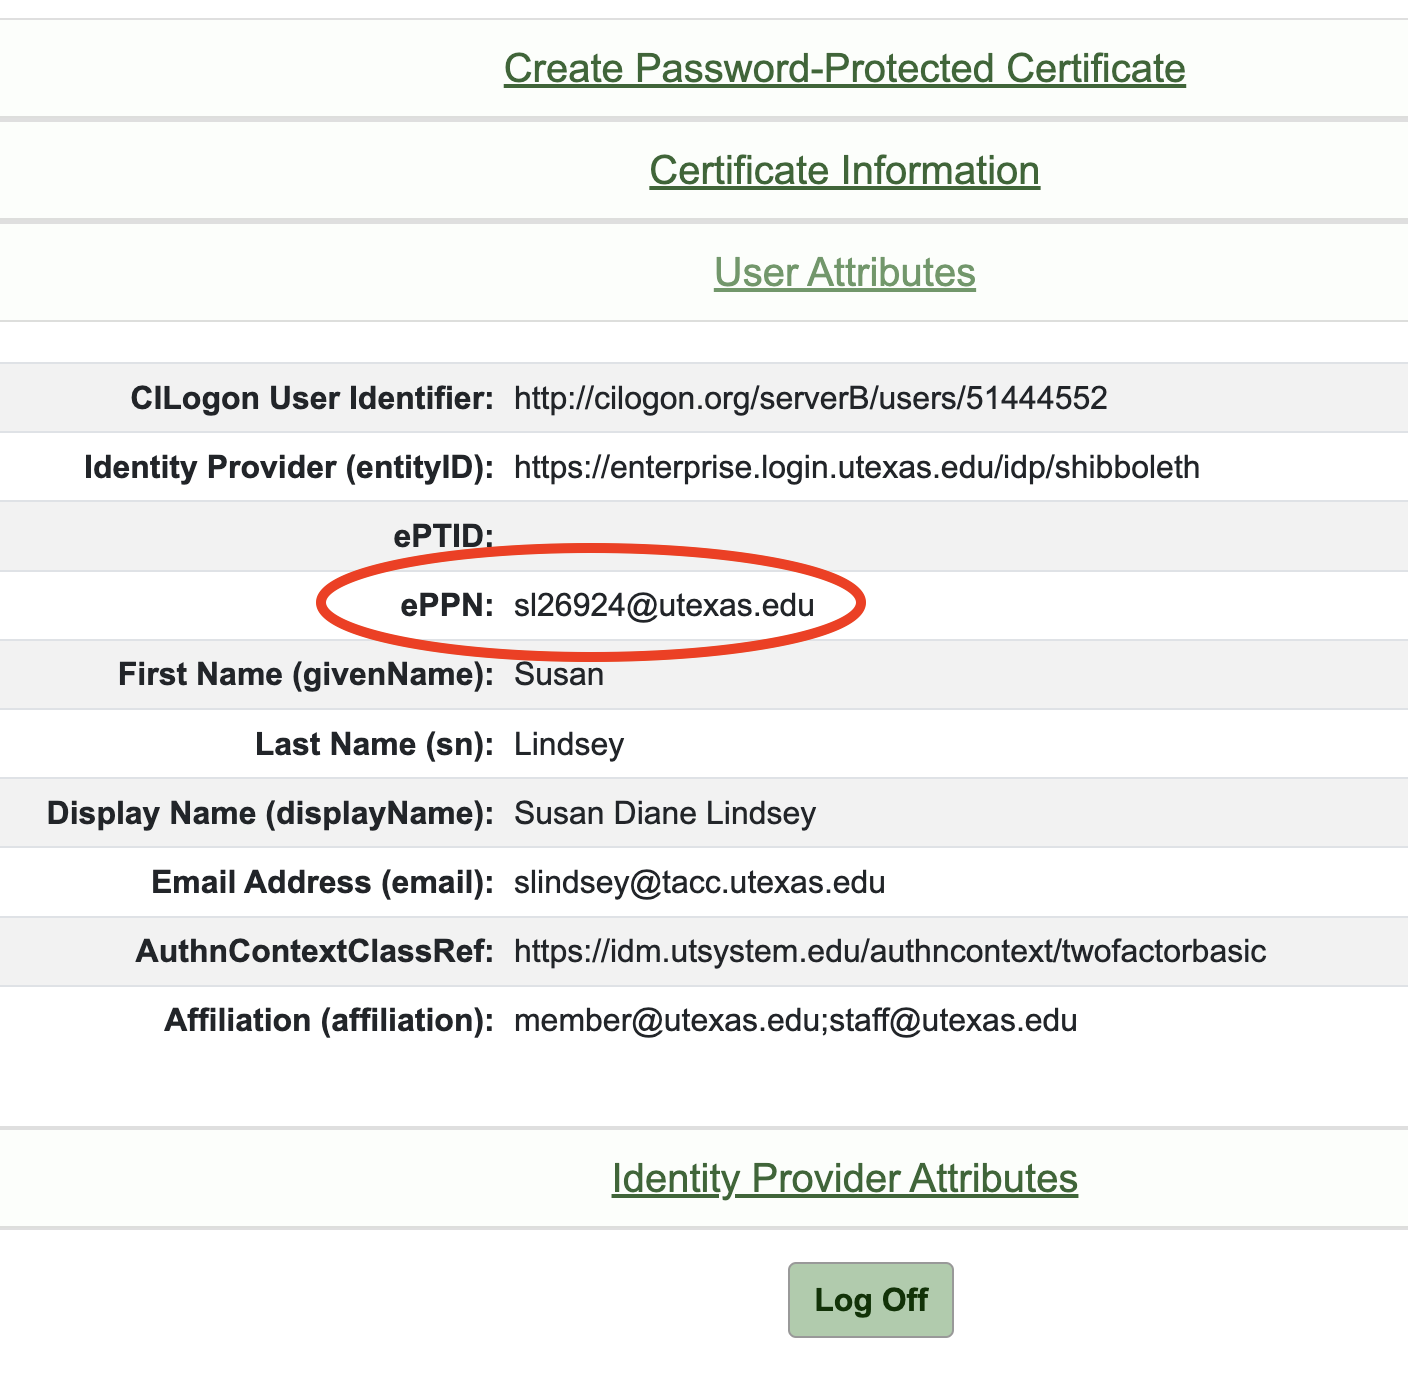
Login to CILogon and click on "User Attributes". Make note of your case-sensitive ePPN.

Step 2. Associate your EPPN with your TACC Account.
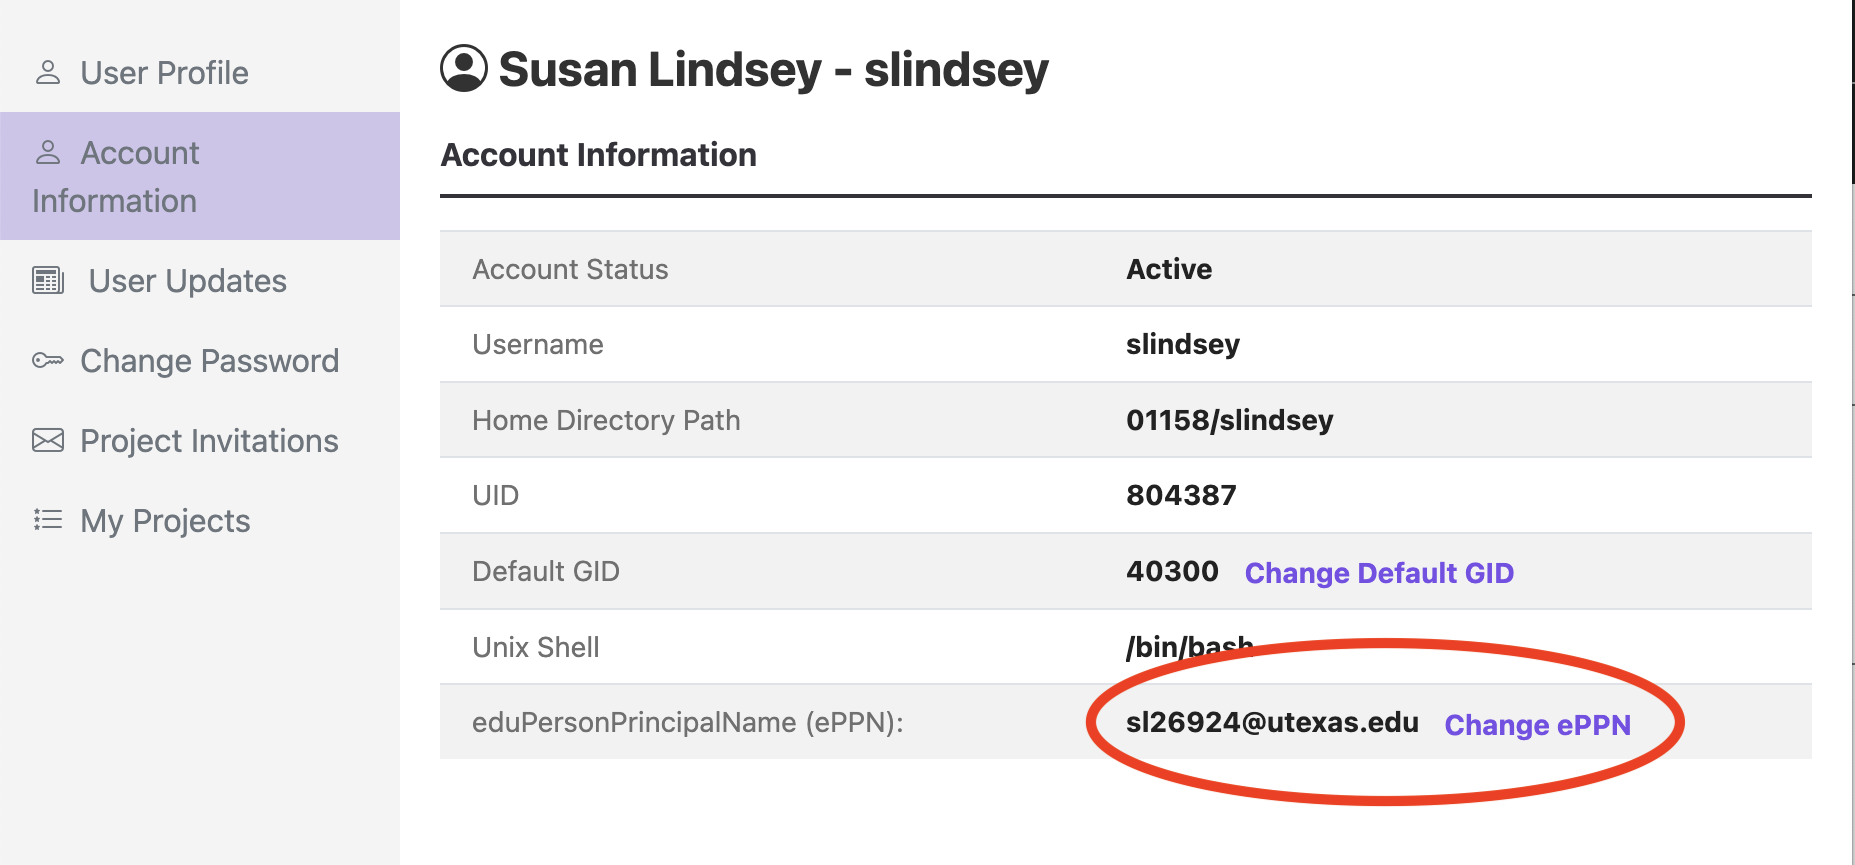
Login to the TACC Accounts Portal, click "Account Information" in the left-hand menu, then add or edit your ePPN from Step 1.
Important
The institution (ePPN) listed in your TACC account profile, must map to the ePPN you are using to log into GlobusOnline.

Tip
Once you update your ePPN, please allow up to 2 hours for the changes to propagate across TACC systems.
Step 3. Globus File Manager
Once you've completed these steps, you will be able to use the Globus File Manager as usual. If you encounter any issues, please submit a support ticket.
Globus-based transfers usually utilize an endpoint name (usually the name of the HPC or Storage resource you are connecting to) rather than a hostname, but you will still need to know the endpoint name, and you will always need the PATH that you are addressing, in order to successfully transfer data.
